Wednesday 18th February - Indoor Plants with Moss & Moor
Propagation

Although this simple guide is written for any grower who wants to take fuchsia cuttings it is written with the beginner in mind.
Fuchsia plants, along with pelargoniums, are amongst the easiest plants from which to take cuttings and that is probably one of the reasons people grow them.
When to take cuttings
Fuchsia cuttings can be taken at any time of the year although the best time is September/October, especially if growing for exhibition when the shape of the plant can be controlled by nipping out the buds.
Equipment:
Sharp cutting knife, small secateurs or small pointed scissors
Small pot
Growing medium - They can be rooted in most mediums but it is normal to root them in a proprietary potting compost (peat based or peat free) usually with the addition of sand, and vermiculite/perlite.
Propagator – lidded sweet jars/coffee jars/jam jars are suitable alternatives
Labels
Taking cuttings
Before taking a cutting, select a mother plant which is in good health , flowers well, and has soft growing tips with at least two pairs of leaves. For exhibiting choose a plant which has symmetrical growth.
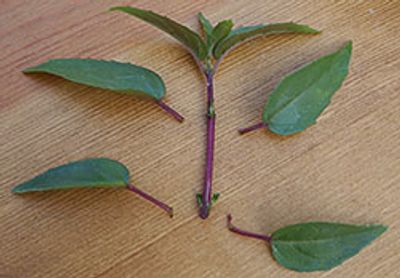
Having chosen the mother plant, water it 24 hours prior to taking a cutting. Cut the shoot of the plant just above a leaf joint (node) containing the growing tip. Remove leaves at the base ensuring that there are two leaves remaining. The leaves can be cut in half to prevent moisture loss and the risk of leaves touching. This is especially the case when potting a number of cuttings into 1 container.
Potting-up
Place the growing medium in the small pot and make a hole , one for each cutting . Place the cuttings in the pot ensuring that the lower leaves on the stem are just touching the compost and the leaves are not touching each other. Firm the compost back around the stem. Water in the cuttings so that the compost is damp (not wet) and allow to drain. Label the cuttings then put them, immediately, into the propagator. If cuttings are taken in spring or summer they should be kept in s cool place. For autumn cuttings keep in a heated greenhouse or on a window sill..
NOTE: If you can’t pot on straight away place the cuttings in a plastic bag along with a label identifying the cuttings.
After 2 to 3 weeks check if the cuttings have taken by gently tugging the leaves when there should be resistance to movement.
Potting-on
Do not remove a cutting for potting-on until it has rooted sufficiently. Gently remove the cutting from the compost in the pot without damaging the roots. Place the cutting in a 2 ½” pot filled with a proprietary compost ensuring it is planted to the same level as it was in the cutting compost
Note: It is best not to pot-on rooted cuttings until they get too large for their container.
Place the pot where it is to be grown turning the plant regularly to ensure even growth especially if you are growing to exhibit. After 3 sets of leaves have formed remove growing tips to encourage bushiness. During the first season keep the plants in pots no greater than 5” unless the plants are to be used in a container, border and/or hanging baskets.
Tip Cuttings (Ken Pilkington method)
Take cuttings as if pinching out, using a sharp blade cut it from the mother plant just above the pair of leaves immediately below the cutting, trim the stem to leave about an eighth of an inch below the lower leaves. To help prevent wilting remove some of the leaf area, do this by placing the growing tip between your forefinger and thumb, with the shoot hidden just below the top of your thumb. With a sharp pair of scissors cut off all the leaf above your thumb. Fill a 3" pot and fill with a moist mix of 2 parts multi purpose compost, one part sharp sand and one part perlite/vermiculite, take cuttings and insert them into the surface of the compost, plant 7 around the pot and one in the middle, give them a light mist of water, label them and place in the propagator. Growth from these is much softer and the cuttings root quickly. These are now treated as one plant. Keep out of sunlight and rooting should take place in about 3-4 weeks. When established they can be re-potted, carefully tap the cutting out of its existing pot and place in a slightly bigger pot, stroke the outer plants down and also push them outwards to splay them so they cover the sides of the pot this is to help hide any bare stems.
NOTE: If a 4 ½” pot is used you could use more than 1 variety i.e. 11 round the outer edge and 5/6 in the middle.